Share
Pin
Tweet
Send
Share
Send
Such a chic blanket will undoubtedly decorate the nursery and reliably protect the child from the cold. True, to stitch it, it will take time and patience.
But thanks to our detailed course, you can handle this problem easily.Blanket size: 220 x 245 cm
YOU WILL NEED:
- fabrics see below
- suitable sewing thread - measuring tape
- tailor's chalk
- scissors
- roller knife cutter
- litter for cutting
- pins
- wrapping paper
- Freezer Paper with elliptical raster
- large safety pins
- suitable quilting needle
- adhesive crepe tape
- see also General information

General information
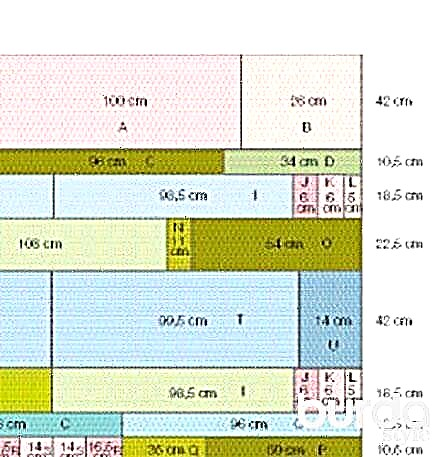
In the photo you see the GENERAL PLAN OF THE TOP OF THE CLOTHES OF RECTANGULAR SHADES
On this basis, rows of ellipsoid rags are then sewn. All details of the cut already have allowances for seams with a width of 5 mm or 1 cm. Before cutting, be sure to wash, dry and iron all fabrics in order to avoid further distortion of the fabric from shreds.
FABRIC CONSUMPTION
For the upper side of the shreds, you will need 5 fabrics with a different pattern 110 cm wide.
Fabric 1: 2.30 m.
Fabric 2: 1.20 m.
Fabric 3: 1.00 m.
Fabric 4: 0.80 m.
Fabric 5: 1.60 m.
For the underside: cotton plain fabric or fabric with a small pattern 7.50 m long, 110 cm wide.
Gasket: cotton non-woven size. 250 x 270 cm.
Plan details of the upper side of a rectangular patchwork quilt
Upper left and right
Left and right bottom corner


Fabric cutting table


CUT
Upper side: from parts 1-5, cut out the details according to the diagram and table.
Tip: so as not to get confused in many different details, write their numbers on a piece of adhesive (masking) tape and stick on the front side of each patch.
From the fabric for the underside of the blanket, cut out 2 details, size 59 x 250 cm and 1 part size. 109 x 250 cm.
Tailoring: arrange the details for the upper side of the blanket according to the pattern.
Stitch details (shreds) in separate rows, all allowances for the sutured-live in one direction. Then sew rows 1-11 into the main fabric for the upper side of the blanket. To iron all allowances in one direction.
Stitch the three parts for the underside so that the wide part is in the middle. Iron the seams.
Lay the underside upside down. Lay a gasket on it, then - face up - a patchwork cloth. Chip all three layers with safety pins, start from the center. Always smooth fabrics with your hand towards the periphery.
Upper elliptical patchwork pattern


YOU WILL NEED:
4 colored fabrics with a light background, each 70 cm long, 110 cm wide.
4 colored fabrics with a dark background, each 70 cm long, 110 cm wide.
CUT TO:
for rows of ellipsoid rags, cut the following parts from fabrics with light and fabrics with a dark background.
11 parts in size 54 cm high and 17.5 cm wide.
15 parts in size 46 cm high and 13.5 cm wide.
12 parts in size 39 cm high and 9.5 cm wide.
For the underside of the blanket, carve the following details:
11 parts in size 54 cm high and 34 cm wide.
15 parts in size 46 cm high and 26 cm wide.
12 parts in size 39 cm high and 18 cm wide.
SEWING:
for rows face to face, fold one piece each of fabric with light and fabric with dark background. Stitch along one of the long sides. Deploy details, iron allowances in one direction. Then, fold one piece for the upper and one for the lower sides face to face, combining the slices.
Depending on the size of the ellipse, take the corresponding part from the Freezer Paper and apply it with an adhesive layer to the fabric so that the marked longitudinal axis lies on the seam. Fix the paper parts by ironing and grind both layers of fabric along the paper contours. Remove parts from paper, cut off allowances to a width of 5 mm.
To invert the ellipses on the back, leave a hole in the seam approx. 7 cm. Unscrew parts, iron edges. Now on the top side of the blanket, mark 6 vertical lines, as in the diagram.
Position the ellipses according to the pattern and fix it on the blanket, best noticing them. Now grind each ellipse along the contour. Stitch row by row. That is - first sew the right side of the row from top to bottom, then sew the left side of the row. If you are sewing on a machine, use a zigzag stitch or other decorative stitch. If you sew by hand, sew with small stitches along the contours of the ellipses, while making sure that you grab all layers of the blanket.
ASSEMBLY:
To clean the edges of the blanket, surround the sections with a border.To do this, cut a strip of 5 cm wide from the rest of the fabric for the underside of the blanket. Turn the edges of the blanket over with a finished oblique tape 1 cm wide.
Elliptical patchwork quilt
Ellipse pattern

MAKE ELLIPSES:
for templates, display photos and enlarge to the desired size. Large: 26.5 cm high and 16.5 cm wide.
Medium: 22.5 cm high and 12.5 cm wide.
Small: 19 cm high and 8.5 cm wide.
Cut paper parts, copy first in the horizontal, then in the vertical direction. As a result, you get full ellipses.
Share
Pin
Tweet
Send
Share
Send