Share
Pin
Tweet
Send
Share
Send
Do you want to make yourself a shirt dress or shirt for your son? To make your model look perfect, do not forget about the cuts of the sleeves. We will show you how to correctly execute them.
The main thing is to prepare correctly
Use the toothed wheel and burda carbon paper (buy at Burda store) to transfer the contours (seam lines) to the seamy side of the sleeve, the stitching and alignment lines of the bar, the cut line, and also the crease line, and the contour and fold line on the sleeve bar. Transfer to the front side of the sleeve the line for combining the plank and the crease line. Manually sew counting stitches along these lines. Cut out two edging strips of approx. 3 cm and about 4 cm longer than the cut mark.


Top left photo: Iron on the plank allowances along the cuts of the acute-angled end to the wrong side. Fold the bar along the fold line, with the wrong side inward, and iron, also iron the allowances to the top.
Second photo on the left: Re-lay the bar flat. Perform a notch on the allowance in the corner close to the marked seam line. Iron down the seam allowances along the upper cross section and along the short side section. Set the bar thus prepared to one side.
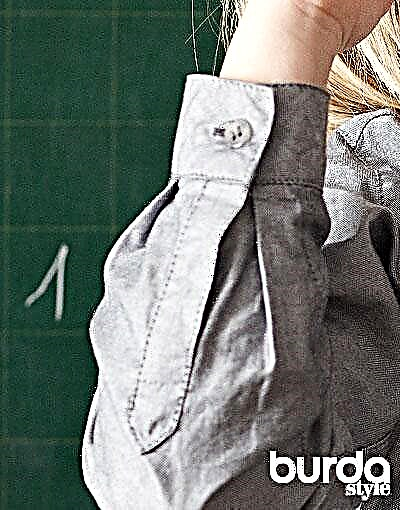
Second photo on the right: Cut the sleeve along the cut mark.Pin the edging to the rear edge of the section (this is the edge that is closer to the side section of the sleeve) with the front side to the front side and grind at a distance of 7 mm, while top finishing the stitch 7 mm above the end of the section. At the beginning and end of the seam, perform tacking.
Top right photo: Notch from the wrong side of the sleeve from the end of the cut to the last stitch obliquely, without grabbing the edging.


Above left photo: Iron seam allowances on the trim. Iron the open longitudinal section of the tape on the wrong side to a width of 7 mm.
Second photo on the left: Fold the edging in half, pin over the stitching seam and stitch it to the edge.
Second photo on the right: Pin the bar on the front edge of the cut (= place to grind the bar) with the front side to the front side and stitch.
Photo at the top right: Notch on the sleeve from the wrong side from the end of the cut up obliquely, without grabbing the bar.


Top left photo: Unscrew the seam allowances at the upper end of the cut on the front of the sleeve. Unscrew the upper end of the edging on the front side.
Second photo on the left: Press the bar over the seam of the sewing and pin the upper end according to the marking.
Second photo on the right: Fold the bar along the fold line and pin it over the stitching seam.
Photo at the top right: Stitch the bar along the seam of the sewing in close to the seam, while grabbing the inner half of the bar. Stitch the upper end of the bar along the marked transverse line.
Share
Pin
Tweet
Send
Share
Send